What’s Christmas About

IMG_7769

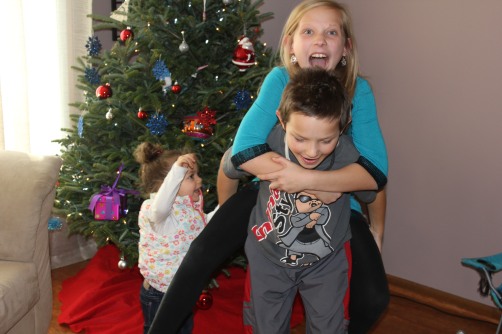
These are 3 of my grandchildren.  And it’s rare to see them all getting along at the same time!  So when we were almost done setting up the tree, I had to capture these precious moments to keep and now share.

Khali is the little one on the left.  She just turned 2 in October.  She came to live with me in May of 2012.  Brooklyn just turned 10 in October and that’s her brother Caleb she’s holding on to (hoping he won’t drop her), he turns 9 in January.  Those two have lived with me since 2008.

As I’m typing this I realize I have a pretty big smile on my face and tears are starting to form in my eyes.  Most days with the kids aren’t always presenting a smile.  For those of you that have kids old enough to bicker and battle with each other you know what I’m talking about.  And when those days happen, or should I say when those moments happen, it can be tough.

IMG_7767These kids go to school and play with friends that have a mom and most likely a dad that take care of them.  And my two have a grandma they call Nana that they live with.  They’ve been through struggles most of us as adults can’t even imagine seeing or going through.

When their friends ask why they live with their grandma, they aren’t really sure what to say.  But I tell them that they have a home that is filled with love and a grandma that has chosen to have them live with them because that’s just how life turned out to be.

IMG_7755I’ve said this many times before, I may not be perfect (well ok, most days I think I am!!!), but I do what I can and I do what I have to  where help is needed.  And when there are children involved, our hearts should all be willing to give.

As I grow older and wiser as time goes by, I’ve realized that what I’m doing is one of the most important things in not just my life, but their lives.  And though they have hurt and pain and so many unanswered questions, they are my life.  And I would do it all again if I had to.

IMG_7770The smile on their faces are priceless.   You can’t take that away.

IMG_7772
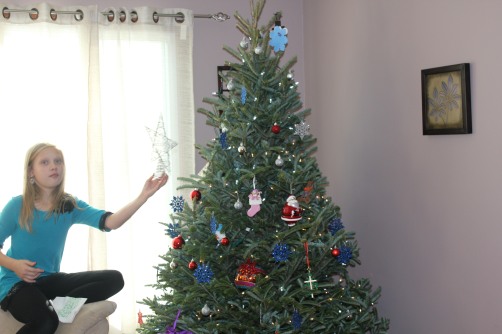
That’s our tree.  We got a real one this year.  The house smells fabulous.  And it couldn’t be any prettier.  It was decorated with love and caring little hands.  (We had some dogs that had to make their presence known too – that’s Coco).

IMG_7746

IMG_7751

I’ve done my best this year to teach the kids the true meaning of Christmas.  Yes, we all love waking up on that morning to see what’s been left under the tree for us. And sometimes that meaning falls short.  But I want the kids to know why we set up our tree.  What each piece means.  What the star means, what the candy cane represents, what the gifts that Jesus got mean.  I want the kids to know and learn as much as they can each and every year.  Enjoy your family/friends and the time you spend with them this year.

This Christmas I pray for each and every family to have a home filled with love.  A family that they can lean on.  Someone to put a smile on their face.  Opening a gift will give that joy for a moment, but the true joy is the meaning of life and family.  If you don’t have that I pray you find people in your life that will be that for you.

May many new memories be made for you and yours.  May you have a blessed holiday and the beginning of a wonderful new year.

From our home to yours.

Patricia

“Lofthouse” Cookies for Santa

IMG_7808

Christmas Eve is just a couple of days away.  I’ll admit, I wasn’t in the baking mood this year.  I had went to Jodi’s house and got a container of cookies, toffee and other goodies to leave out for Santa.  BUT, I knew my grandkids needed to make the cookies and decorate them themselves for Santa.  It just wouldn’t be the same if we didn’t.

I thought for sure we had a sugar cookie recipe on our own site that we use each year for christmas baking, but I just didn’t find it.  And I’m thinking I didn’t find it because I needed to make these instead.  I got to Target at least 4 times per week.  I walk past the Lofthouse cookies and so want to buy them.  Most times I don’t but I did last week.  Not for me of course, but for the kids (ok I had one).  But these cookies are so good.  So when I went to my go to site for a recipe (Brown Eyed Baker) the first one that came up was this one.  I HAD TO MAKE THESE.

Let me say that I did buy a pack of Pillsbury Sugar Cookie dough JUST in case I may have needed it!  Yay for me, I didn’t.  These turned out really well.  Not quite as sweet as the store bought ones but pretty dang good.    BEB did have a recipe for the frosting in her site as well but I made a different cream cheese frosting (click this link to see how I made it).  The only reason I made the cream cheese frosting is because I didn’t have Heavy Cream and had no intentions of running back to the store again.

I’m not going to  say that these were easy to make.  It’s not hard to make them, it’s just me that is a bit on edge when trying to bake something new.  Especially when they’re for Santa, the big event you know.  There’s a lot riding on these cookies for the big guy.  If he didn’t like them, well then that could determine what he left under the tree!

IMG_7782

Yep, I added the first bit of flour for the cookies and of course it flew out all over.  I had to laugh and capture this on camera!  Not pretty in here at that time at all, but I had fun!  It landed on my feet and all!!!

IMG_7788Here’s the dough just waiting in the fridge patiently for me to take out and roll it out.

IMG_7789One of my issues with making dough for these kinds of cookies is that the dough always sticks to my rolling pin or the counter and I get frustrated and just use the pre made stuff from the store.  But this time I had great success.  Not sure what I did different but I only had it stick to the counter a bit and after I added a bit more flour it was just fine.

IMG_7791They turned out just perfect!!!!!!

IMG_7798

Next up?  The frosting.  I used the cream cheese frosting not just because I didn’t have the Heavy Cream and didn’t want to go to Target, but it’s one of our favorite here!!!

IMG_7800

Here’s the green bowl!

IMG_7802Here’s the red.  It looks a little pink but I started to run out of the red food coloring!!!!

IMG_7803Doubtful that this batch will last until Tuesday night.  Good thing I save a lot of them just in case.

Brooklyn helped a bit and frosted some of the cookies for Santa.

IMG_7815She did a pretty good job!!!!!

IMG_7817

Her finished product.

I should have some left over to bring to our Christmas Eve dinner!!

This year has gone by fast.  Times have changed, the kids have grown older, but one thing remains the same.  I’m very blessed to have a home to take care of my grandkids that have come to be with me.  Most have this time to spend on their own after their kids have grown doing what they want.  I’ve chosen to give up that freedom and take in kids and give them love and a home.  I may not be perfect and I may not always do the right things but I have faith that God will provide for us as He has for the past 7 years.  I’m thankful at this time of the year that I can not only give the gifts that will be opened on Christmas day but the gift of what Christmas is truly about.

May your home be blessed with love, hope and joy this holiday season.

From our home to yours…Happy Holidays.  May the new year bring your hopes and dreams to reality.

“Lofthouse” Cookies for Santa
Recipe Type: Cookies
Author: Patricia
Prep time: 30 mins
Cook time: 7 mins
Total time: 37 mins
Ingredients
  • For the Cookies:
  • 6 cups all-purpose flour
  • 1 teaspoon baking soda
  • 1 teaspoon baking powder
  • ½ teaspoon salt
  • 1 cup unsalted butter, at room temperature
  • 2 cups granulated sugar
  • 3 eggs
  • 2 teaspoons vanilla extract
  • 1½ cups sour cream
Instructions
  1. DIRECTIONS:
  2. In a medium bowl whisk together the flour, baking soda, baking powder and salt; set aside.
  3. In the bowl of a stand mixer with the flat beater attached, cream the butter and granulated sugar at medium speed until light and fluffy, about 3 minutes. Scrape down the sides of the bowl with a rubber spatula as needed. Add the eggs, one at a time, beating until each is incorporated. Add the vanilla and sour cream and beat at low speed until combined.
  4. Add the dry ingredients and beat at low speed until just combined, scraping down the bowl as needed. Dough will be a bit “sticky”. Divide dough into two sections. Flatten into rectangles about 1½ inches thick, then wrap with plastic wrap. Chill in the refrigerator overnight or at least two hours until firm.
  5. Preheat the oven to 425 degrees F. Line large baking sheets with parchment paper; set aside.
  6. Flour the countertop and the top of the dough. With a rolling pin, roll the dough out to ¼-inch thickness. Using a 2 1/2-inch round cookie cutter, cut out circles and transfer to a baking sheet. Bake for 7 minutes, until pale golden. Immediately transfer cookies to a wire rack to cool. Cook cookies completely before frosting.
  7. Once cookies have cooled completely, frost and add sprinkles. Allow frosting to set, then store in an air-tight container. Let cookies sit for several hours before serving to allow the flavors to develop.

Two Girls Cooking – Patricia 😉

Source

Brown Eyed Baker

Whole Wheat Banana Pancakes

IMG_7717

It has been a long time since I’ve been on here.  Too much going on in life.  Nothing more I can say.  I have things to blog and then I haven’t.  Now the holidays are coming and…where has the time gone?

Speaking of holiday’s.  This would be the perfect Christmas (for those that celebrate it) breakfast.  We had it for dinner tonight!  We love to have these types of foods for dinner.

The kids enjoyed it as well.

IMG_7715Khali just dips her fingers in the syrup and leaves the pancake on the plate (she later did eat it though!!).

IMG_7714Caleb really doesn’t like to have his picture taken so he’s acting like he can’t see me taking this.  But he’s eating here too!!!!

IMG_7716Brooklyn ate her pancakes and came back for seconds, but she’s more concerned about having her picture taken.

The reason for these pancakes?

Well, I’ve been trying to remove as much processed foods from our diet as possible.  It’s not an easy task by any means, but I’m working on it.
I found a great website that has a ton of recipes – which is where this came from.  I shopped for the week and I’ll have to say that I didn’t spend any more money than I would have for foods that aren’t as good for you.

I haven’t been as good lately with making the healthiest dinners lately.  As I’ve said, life has been pretty busy.  But it’s time to pay attention to the food we’re putting in our bodies.  Moderation is the key, yes.  But we’re trying!!!

This week I made home made refried beans as well.  I ate those twice for lunch.  GREAT.

Check out the website and let me know what you think.

I did add some cinnamon to this recipe to add a bit more flavor.  To me, I could really taste the flour too much.  After adding a bit, it was fabulous.

We’ll have these again.

Whole Wheat Banana Pancakes
Recipe Type: Breakfast
Cuisine: Pancakes
Author: Patricia
Ingredients
  • 2 cups whole-wheat flour (I use King Arthur’s organic white whole-wheat flour)
  • 2 teaspoons baking powder
  • 1 ½ teaspoons baking soda
  • ½ teaspoon salt
  • 1 tablespoon honey
  • 2 large eggs, lightly beaten
  • 1 ¾ cups milk
  • 2 tablespoons unsalted butter, melted + butter for frying
  • 2 ripe bananas, mashed
  • 100% pure maple syrup for serving – I didn’t have 100% pure maple syrup so I tried to use a little of what we had.
Instructions
  1. In a large bowl, whisk together the flour, baking powder, baking soda, and salt.
  2. Make a well (hole) in the center of the flour mixture and pour in the honey, eggs, milk, and 2 tablespoons of melted butter. Whisk together thoroughly, but do not overmix.
  3. Gently fold the mashed bananas into the batter with a spatula.
  4. Heat a griddle or sauté pan over medium-high heat. Swirl enough butter around the pan until it is well coated. Add pancake batter using a soup ladle.
  5. When the pancakes have begun brown on the bottom, flip them over to cook the other side.
  6. Serve with warm maple syrup and a side of fruit. And don’t forget to freeze the leftovers for another day!

Have a great rest of the week.  Try this for breakfast this weekend!!

Patricia – Two Girls Cooking

100 Days of Real Food

Tres Leches (Milk Cake)

IMG_7209

My aunt Judy and uncle Ken are moving to a warmer destination.  For their going away party, I made a Tres Leches Cake (milk cake).

Since I had never made this cake before, it was suggested that I try a piece before others taste it.  You know, to make sure it’s good!  And it was.  Very good.  Moist, which is what the milk did!!

I don’t think I’m going to get to show a picture of the cake on a plate, unless I take it at the party!  Which may be a great idea now that I think about it!!

I was asked if it was a good idea to bring a cake that I had never had before to a party!  So I did cut a piece and make sure that it was party suitable.   It is.

Very easy to make.  The frosting on top, love it.

Here’s my aunt Judy and me at the party!!

IMG_0339

And my Uncle Ken, Aunt Judy and my cousin Camille.

IMG_0336

And Camille made some pretty awesome cupcakes for the party too!!!

IMG_0338

How cute are those?  And they tasted pretty dang good.

Well, Judy and Ken will be off to their next journey in life!!  I’m excited for them.  My plan is to visit…often.  Judy said I could.  Hoping you remember that!!!

I love you Aunt Judy and Uncle Ken.  Many blessings on your new adventure.

Tres Leches (Milk Cake)
Recipe Type: Cake
Author: Patricia
Ingredients
  • 1 1/2 cups all-purpose flour
  • 1 teaspoon baking powder
  • 1/2 cup unsalted butter
  • 1 cup white sugar
  • 5 eggs
  • 1/2 teaspoon vanilla extract
  • 2 cups whole milk
  • 1 (14 ounce) can sweetened condensed milk
  • 1 (12 fluid ounce) can evaporated milk
  • 1 1/2 cups heavy whipping cream
  • 1 cup white sugar
  • 1 teaspoon vanilla extract
Instructions
  1. Directions
  2. Preheat oven to 350 degrees F (175 degrees C). Grease and flour one 9×13 inch baking pan.
  3. Sift flour and baking powder together and set aside.
  4. Cream butter or margarine and the 1 cup sugar together until fluffy. Add eggs and the 1/2 teaspoon vanilla extract; beat well.
  5. Add the flour mixture to the butter mixture 2 tablespoons at a time; mix until well blended. Pour batter into prepared pan.
  6. Bake at 350 degrees F (175 degrees C) for 30 minutes. Pierce cake several times with a fork.
  7. Combine the whole milk, condensed milk, and evaporated milk together. Pour over the top of the cooled cake.
  8. Whip whipping cream, the remaining 1 cup of the sugar, and the remaining 1 teaspoon vanilla together until thick. Spread over the top of cake. Be sure and keep cake refrigerated, enjoy!

Patricia – Two Girls Cooking

Source

All Recipes

Caramel Apple Pie Fudge

IMG_7194

Oh my goodness.  If you love fudge, you must try this.  I had made this a couple of weeks ago and it didn’t turn out so well.  I used white chocolate chips instead of white baking squares.  So this time it settled and tasted ah-mazing!!!

I mentioned that we got home grown apples from Khali’s grandparents last week but this recipe called for dried apples.  So we just keep eating those nummy apples for our snack right now!  I’ll come up with another recipe soon for those apples.

In the past few years I’ve grown to love, love, love sweets.  Not sure when this happened.  And I’m not sure if I’m ok with it.  Oh I do love eating it, I’m just not sure if I should be eating it.  Sitting down with a pan of this fudge is dangerous.  We have a saying that we have at work:  Stay strong or indulge completely.  Well I’ve tried my best to stay strong with sweets.  Some days are just harder than others.  And fudge is a favorite of mine.

The last time I made this I didn’t let the white chocolate melt completely.   So try again and hope for success.  Which is is!!!!

IMG_7179

The chocolate baking bars instead this time.

IMG_7184

Caramel.  Need I say anymore?  Nope.

IMG_7187

Pour the caramel over the top and use a knife to swirl it in.  Oh yum.

IMG_7189

I sprinkled some cinnamon on the top before putting it in the fridge.  Wow, this so good.

You have to try it if you love fudge.  Well you should just try it because it’s good!!!  Enough said.  Just saying.

IMG_7199

Of course you have to add a bit more caramel for your own piece.  No one will know!

Enjoy your day and bake away!!

Caramel Apple Pie Fudge
Recipe Type: Fudge
Author: Patricia
Prep time: 10 mins
Cook time: 15 mins
Total time: 25 mins
Ingredients
  • Ingredients
  • • 3/4 cup apple cider
  • • 3/4 cup unsalted butter
  • • 1 (5 ounce) can evaporated milk
  • • 3 cups sugar
  • • 2 cups white chocolate chips
  • • 3/4 cup dried apple, finely diced
  • • 1 teaspoon vanilla
  • • 1 teaspoon cinnamon
  • • 1/2 teaspoon nutmeg
  • • 1/4 teaspoon all spice
  • • 1/4 cup caramel
Instructions
  1. Directions
  2. Line an 8×8 baking dish with parchment paper (13×9 inch pan if you like your fudge thinner.) Set aside.
  3. In a large saucepan combine the first four ingredients, bring to a rolling boil and stir continuously for 4 minutes (because the mixture burns easily.) Remove from heat.
  4. Add white chocolate, dried apple, vanilla, and spices; blend well, stirring for several more minutes until chocolate is completely dissolved. Pour into baking dish. Heat Dulche de Leche in the microwave for 15-20 seconds to loosen. Drizzle or drop dollops around in the baking dish and swirl through with a dull knife for a marbled effect.
  5. Refrigerate for at least 3 hours (or overnight), until hardened.
  6. Remove parchment paper from pan and place on cutting board. Cut into squares.
  7. To store: fudge should be refrigerated, in a covered container, for up to one week.

Patricia – Two Girls Cooking 😉

Source

Very Culinary